Each year the guild poses 'challenges' for the members. One such was entitled 'Your Secret Garden'--this time with no specifications as to size, technique, fabric; the challenge pieces were due in February at our annual English Tea, but since we were snowed out, the tea was finally held on May 14th.
One of my personal rules is that I must try a new-to-me technique with each quilt. For this project I decided to do a reverse applique piece--a small one. In reverse applique, one cuts away a top layer to expose other fabrics underneath. I put a design down on drawing paper with an eye to gentle curves and easy-to-manages shapes; the drawing also included a continuous 'frame' around the outer edges. I traced the sections onto pellon with notes about what colors I wanted where, and went about creating the underneath layer--some sections were pieced; others were a single fabric. Then I cut away parts of the drawing in order to use it as a template to mark the top layer, which I decided would be one piece of black print fabric.
 | |
| Cutting away sections in order to create template |
which was 'composed' of different fabrics.)
Some steps were more tedious than others.
 |
| The upper layer is basted onto the 'composed fabric' with pins. |
Below is a closer look at this process.
 | ||
| Pins, gluestick, whatever it takes to turn back the raw edge. |
 |
| Does this remind you of a 'crayon sgraffito' technique from childhood? |
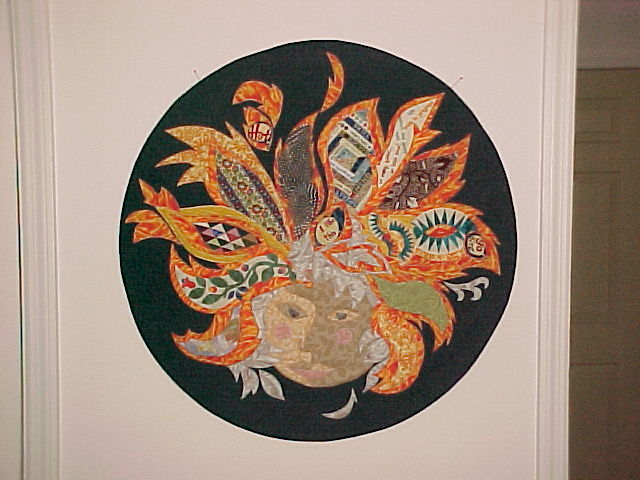
The thick quilt top was layered with batting and backing and quilted with 'invisible' thread, bound, and then hung in a unique way.
And here is the finished piece:
 |
| 'Secret Garden' 2012 |
And some details:


I had a lot of trouble with Blogger--and can't seem to get the big spaces out of the post. I apologize to my tens of readers.
ReplyDeleteWell, spaces in the post or not that quilt is completely gorgeous! That does remid me of the crayon technique, which I think was always one of my favorites, even if I didn't seem to draw much.
ReplyDeleteKudos to you! I hope it was a big hit at the meeting.
Absolutely gorgeous! When you look at the whole thing from a distance it looks like a stained glass window. Where will you hang it? Besides sgraffito, it also reminds me of the Panamanian molas.
ReplyDeleteThis is one of the prettiest pieces I have ever seen! I can't believe you have such creativity and patience. :) Thank you for showing us how you did such a wonderful thing!
ReplyDeleteDang. I have seen it in person and I am newly impressed. I would have loved to see the beneath fabric before you covered it up.
ReplyDeleteI really, really, REALLY love that quilt :)
ReplyDelete